Easy Lemon Pie with Graham Cracker Crust (No-Bake Topping!)
This easy lemon pie features a buttery graham cracker crust and a fresh homemade lemon filling—perfectly balanced with tangy citrus and topped with creamy stabilized whipped cream. A refreshing, from-scratch dessert using real ingredients!
This post may contain affiliate links. As an amazon associate I earn from qualifying purchases at no additional cost to you.
This lemon pie has quickly become one of my all-time favorite desserts. I’ve always loved lemon, but something magical happens when you pair that bright citrus flavor with a buttery graham cracker crust and a generous topping of my homemade stabilized whipped cream.
When I was testing this recipe, I brought it to a lemon-themed girls’ night… and let’s just say there wasn’t a single slice left. It’s that good. The filling is silky, sweet, and tangy—made completely from scratch using real lemon juice and zest (no boxed mixes or shortcuts here). The best part? It’s all cooked on the stovetop. That means no stressing over whether your custard is undercooked or overbaked—just smooth, foolproof results every time.
Whether you’re making it in the heat of summer or brightening up a winter table, this is a dessert that works year-round. It’s everyday cooking at its best!
Why You’ll Love This Lemon Pie
Ingredients You’ll Need
This lemon pie is made entirely from scratch with simple, real ingredients you likely already have on hand. Here’s what you’ll need:
For the Graham Cracker Crust:
- 2 cups graham cracker crumbs Annie’s brand is my favorite for the cleaner ingredients (about 2 sleeves or 14 full crackers, crushed fine)
- I use a blender for this. Blender Options: 1. The Blender I Want 2. The Blender I Have (that still works great)
- 8 tablespoons butter, melted
For the Lemon Filling:
- 1 cup granulated sugar – preferably organic cane sugar
- 4 tablespoons cornstarch
- 1½ cups water
- 2 large egg yolks – keep the egg whites and use them for some yummy scrambled eggs
- Zest of 1 lemon
- 1½ tablespoons butter
- Juice of 1 large lemon (about 4 tablespoons)
For the Topping:
- Stabilized Whipped Cream – I use my homemade version, which holds its shape beautifully and adds the perfect creamy finish. Get the full recipe here!
Step-by-Step Instructions for this Lemon Pie
This easy lemon pie comes together in three simple parts: the crust, the filling, and the topping. Each step is straightforward and uses real, wholesome ingredients.
Step 1: Make the Graham Cracker Crust
- Preheat your oven to 350°F.
- In a medium mixing bowl, combine 2 cups finely crushed graham crackers with 8 tablespoons melted butter.
- Mix until evenly combined, then press the mixture firmly into the bottom and sides of a 9-inch pie dish.
- Bake for 15 minutes, or until the crust is golden and set.
- Remove from the oven and set aside to cool while you make the lemon filling.
Step 2: Make the Lemon Filling
- In a medium saucepan (this is the one I use and love- guaranteed for life and worth the investment), whisk together 1 cup sugar, 4 tablespoons cornstarch, and 1½ cups water.
- Place over medium heat and bring to a boil, stirring frequently. Continue cooking until the mixture thickens—this will take about 15 minutes.
- Once thickened, reduce the heat and stir in 2 egg yolks, the zest of 1 lemon, and 1½ tablespoons butter.
- Cook for another 2–3 minutes, stirring constantly until everything is fully incorporated and smooth.
- Remove the pan from heat and stir in 4 tablespoons fresh lemon juice. The filling will be glossy and full of citrusy brightness.
- Pour the lemon filling into your baked graham cracker crust and spread it evenly with a spatula.
Step 3: Chill and Add Whipped Cream
- Let the pie cool at room temperature for about 1 hour to set the filling.
- Then transfer it to the fridge and chill completely—at least 3–4 hours or overnight for best results.
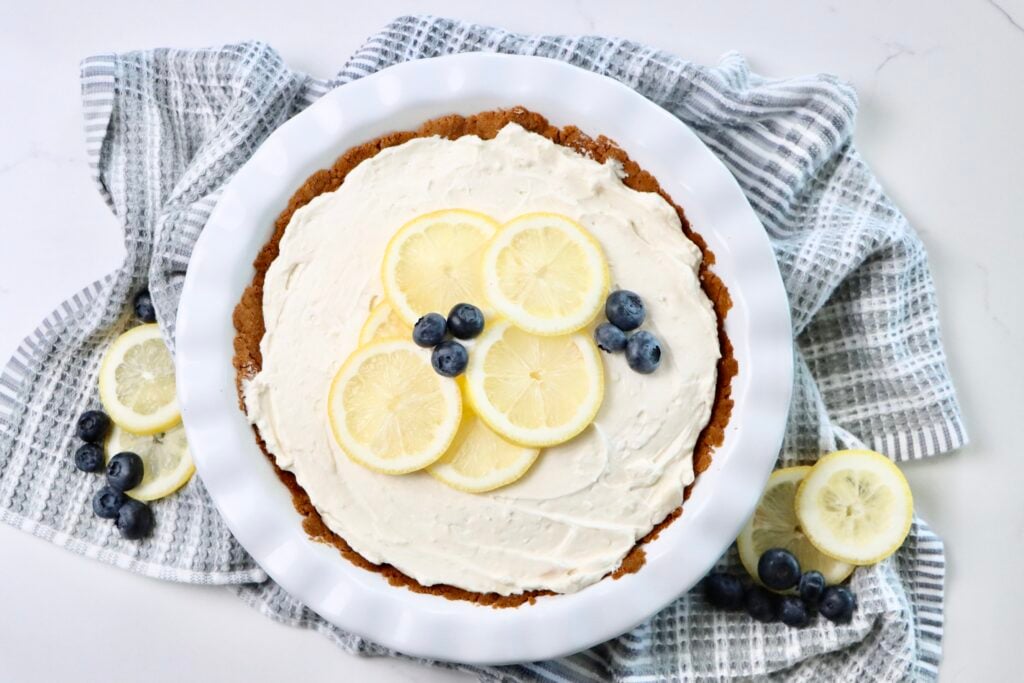
- Once chilled, top with a generous layer of my stabilized whipped cream.
- Optional: Garnish with lemon zest, thin lemon slices, or fresh berries for a beautiful finish.
Tips for Success
These simple tips will help you get the perfect lemon pie every time:
- Stir constantly while cooking the filling
The lemon filling thickens on the stovetop, and it’s important to stir it consistently to prevent lumps or sticking. A whisk works best to keep the texture smooth and silky. My favorite whisk! - Use fresh lemon juice and zest
Freshly squeezed lemon juice gives this pie its vibrant, natural flavor—bottled juice just doesn’t compare. Don’t skip the zest either—it adds brightness and depth you won’t want to miss. My favorite zester! - Cool the pie completely before adding whipped cream
Patience is key here! If the pie is still warm, the whipped topping will melt and lose its shape. Let it come to room temperature, then chill it fully in the fridge before topping. - Stick with my stabilized whipped cream
Store-bought whipped creams tend to deflate quickly and often taste artificial (not to mention the terrible ingredient list). My homemade stabilized whipped cream not only holds its shape beautifully, but it also tastes rich, fresh, and creamy—just what this pie deserves. Get the recipe here.
Serving Suggestions
This lemon pie is refreshing, creamy, and perfect for just about any occasion:
- Serve chilled straight from the fridge for the best texture and flavor.
- Garnish with lemon zest, thin lemon slices, or even fresh berries like raspberries or blueberries for a pop of color and flavor.
- Pair it with a cup of tea, iced coffee, or a sparkling drink for a light and satisfying dessert.
- It makes a beautiful addition to spring brunches, Easter tables, summer BBQs, or even holiday gatherings when you want something bright and citrusy.

How to Store Lemon Pie
- Refrigerator: Store the pie covered in the fridge for up to 3 days. Use plastic wrap or a pie container to protect the topping.
- Make ahead tip: You can make the crust and filling a day in advance, then add the whipped cream topping just before serving.
- Freezing not recommended: Because of the cornstarch-based filling and whipped topping, freezing can alter the texture and cause separation—best enjoyed fresh from the fridge.
More Fresh
From-Scratch Desserts
If you try this recipe and love it, I would love it if you could come back and give it 5 stars! Tag me on instagram @my.colorado.kitchen

Lemon Pie
This easy lemon pie features a buttery graham cracker crust and a fresh homemade lemon filling—perfectly balanced with tangy citrus and topped with creamy stabilized whipped cream. A refreshing, from-scratch dessert using real ingredients!
Ingredients
Graham Cracker Crust
- 2 cups graham cracker crumbs (about 2 sleeves or 14 full crackers, crushed fine)
- 8 tablespoons butter, melted
Lemon Filling
- 1 cup sugar - preferably organic cane sugar
- 4 tablespoons cornstarch
- 1½ cups water
- 2 large egg yolks
- Zest of 1 lemon
- 1½ tablespoons butter
- Juice of 1 large lemon (about 4 tablespoons)
Instructions
Step 1: Make the Graham Cracker Crust
- Preheat your oven to 350°F.
- In a medium mixing bowl, combine 2 cups finely crushed graham crackers with 8 tablespoons melted butter.
- Mix until evenly combined, then press the mixture firmly into the bottom and sides of a 9-inch pie dish.
- Bake for 15 minutes, or until the crust is golden and set.
- Remove from the oven and set aside to cool while you make the lemon filling.
Step 2: Make the Lemon Filling
- In a medium saucepan (this is the one I use and love- guaranteed for life and worth the investment), whisk together 1 cup sugar, 4 tablespoons cornstarch, and 1½ cups water.
- Place over medium heat and bring to a boil, stirring frequently. Continue cooking until the mixture thickens—this will take about 15 minutes.
- Once thickened, reduce the heat and stir in 2 egg yolks, the zest of 1 lemon, and 1½ tablespoons butter.
- Cook for another 2–3 minutes, stirring constantly until everything is fully incorporated and smooth.
- Remove the pan from heat and stir in 4 tablespoons fresh lemon juice. The filling will be glossy and full of citrusy brightness.
- Pour the lemon filling into your baked graham cracker crust and spread it evenly with a spatula.
Step 3: Chill and Add Whipped Cream
- Let the pie cool at room temperature for about 1 hour to set the filling.
- Then transfer it to the fridge and chill completely—at least 3–4 hours or overnight for best results.
- Once chilled, top with a generous layer of my stabilized whipped cream.
- Optional: Garnish with lemon zest, thin lemon slices, or fresh berries for a beautiful finish.
Notes
- Stir constantly while cooking the filling. The lemon filling thickens on the stovetop, and it’s important to stir it consistently to prevent lumps or sticking. A whisk works best to keep the texture smooth and silky. My favorite whisk!
- Use fresh lemon juice and zest. Freshly squeezed lemon juice gives this pie its vibrant, natural flavor—bottled juice just doesn’t compare. Don’t skip the zest either—it adds brightness and depth you won’t want to miss. My favorite zester!
- Cool the pie completely before adding whipped cream. Patience is key here! If the pie is still warm, the whipped topping will melt and lose its shape. Let it come to room temperature, then chill it fully in the fridge before topping.
- Stick with my stabilized whipped cream. Store-bought whipped creams tend to deflate quickly and often taste artificial (not to mention the terrible ingredient list). My homemade stabilized whipped cream not only holds its shape beautifully, but it also tastes rich, fresh, and creamy—just what this pie deserves. Get the recipe here.
Nutrition Information:
Yield: 8 Serving Size: 1 SliceAmount Per Serving: Calories: 374Total Fat: 18gSaturated Fat: 10gTrans Fat: 1gUnsaturated Fat: 7gCholesterol: 106mgSodium: 244mgCarbohydrates: 52gFiber: 1gSugar: 35gProtein: 4g
Nutrition facts are calculated automatically and are approximate.